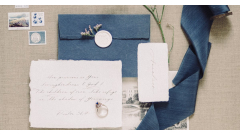
Are you ready to unleash your creativity and make enchanting scrapbook pages that speak to your soul? With the Stamp Garden, creating a captivating design becomes an artistic adventure filled with countless possibilities. This how-to guide will take you through each step needed to bring your scrapbook page to life, transforming simple memories into vibrant works of art.
Imagine layering assorted plant and flower stamps over beautifully inked backgrounds, making every page a unique masterpiece. Pairing different ink colors with your favorite stamps allows you to express your personality while preserving precious moments. Let’s dive into the whimsical world of scrapbooking, where every stamp tells a story and every color inspires joy!

The Stamp Garden kit comes with an impressive collection of 25 stamps, featuring various plant and flower designs ideal for anyone looking to enhance their scrapbooking, printmaking, DIY crafts, or journals. With two vibrant ink colors included, this set encourages creativity and self-expression, making each project a reflection of the artist’s unique style. Whether you’re layering textures or creating beautiful patterns, the Stamp Garden provides the tools needed to turn your artistic visions into reality.
Materials Needed
Creating a vibrant scrapbook page using the Stamp Garden requires a variety of materials to transform your ideas into beautiful artwork. The first essential items are the scrapbooking papers. Choose a sturdy cardstock or patterned paper in your preferred colors, as this will serve as the background for your creativity. The Stamp Garden comes equipped with 25 diverse stamps featuring assorted plant and flower parts, which will add texture and interest to your page. Select inks that complement your paper choice—utilize the two ink colors provided with the Stamp Garden for a lively touch. Make sure you have an ink pad for each color to facilitate easy stamping.
When it comes to assembling your page, using adhesives is a must. Craft glue or double-sided tape will securely hold the pieces together. Scissors play a vital role, particularly for cutting any additional photos or embellishments you wish to incorporate. Elevate your page further with embellishments such as washi tape, stickers, or glitter, enhancing the overall aesthetic of your design. A blending tool can also come in handy for some creative inking effects.
- Scrapbooking papers (cardstock or patterned paper)
- 25 stamps from the Stamp Garden
- 2 ink colors from the Stamp Garden
- Ink pads for each color
- Craft glue or double-sided tape
- Scissors
- Embellishments (washi tape, stickers, glitter)
- Blending tool (optional for effects)
Preparing Your Workspace
Creating a dedicated and organized workspace is essential for getting the most out of your Stamp Garden set, which includes 25 assorted stamps, 2 vibrant ink colors, and various plant and flower parts. Start by choosing a flat surface that is spacious enough to accommodate all your materials while providing you with ample room to work comfortably. Cover your workspace with a protective mat or newspaper to safeguard against any ink spills or scratches—this step is crucial as it ensures the longevity of your table and keeps your area tidy.
Next, arrange your materials in a way that promotes efficiency. Place your Stamp Garden stamps within easy reach, ideally in a stamp organizer or a shallow container that keeps them visible. Position the ink pads close by, ensuring you have a clean workspace to press your stamps. Consider organizing the assorted plant and flower parts by theme or color, utilizing small bins or containers for quick access. Keep wipes or a damp cloth handy for easy cleanup after inking. This method will streamline your crafting process and help you maintain a clean environment as you work.
- Use a non-stick craft mat for extra protection.
- Label containers for quick identification of materials.
- Ensure proper lighting to avoid eye strain while working.
- Maintain a trash bin nearby to easily dispose of any scraps.
Stamping Techniques
Utilizing the diverse array of 25 stamps from the Stamp Garden collection opens up a world of creative possibilities for your scrapbook pages. The assorted plant and flower parts allow for unique designs that can be achieved through various stamping techniques. One effective method is layering stamping, which involves using multiple stamps to build depth and texture. Start by choosing a base stamp, such as a larger flower or leaf, and ink it with one of the two colors provided. Once this layer is dry, position a smaller stamp on top using a contrasting color to create a stunning focal point. This technique not only adds dimension but also visual interest to your scrapbook page.
Another exciting technique is off-setting, which employs a slight misalignment between the stamps for a more dynamic look. When stamping, apply some pressure and then gently move the stamp slightly out from the original position before lifting it. This technique can create an alluring shadow effect, particularly with the intricate designs in the Stamp Garden collection. For those looking to experiment with color blending, try using both ink colors on a single stamp to create a gradient effect. Apply a light layer of one ink color to half of your stamp, and then add the second color at the opposite end. By blending them gently with a sponge or dauber, you can achieve a smooth transition that brings your floral designs to life.
- For best results, ensure all stamps are clean before switching colors.
- Practice on scrap paper before committing to your scrapbook page.
- Use archival-quality inks to ensure longevity and vibrancy in your projects.
Layout Planning
When creating a stunning scrapbook page featuring the versatile Stamp Garden, which includes 25 stamps and 2 ink colors designed for plant and flower parts, the foundation lies in effective layout planning. Begin by considering the theme or story you want to convey in your scrapbook page. This could be a special event, a seasonal celebration, or even a collection of everyday moments. Once the theme is established, sketching out a preliminary design is an excellent way to visualize your page. Use a pencil to create a rough layout, identifying areas where different elements will be placed, ensuring to integrate the stamped images prominently.
As you sketch, consider the balance and flow of your design. Place the larger stamped images strategically to draw the viewer's attention, using smaller elements to complement and support the larger visuals. When arranging your items, think about overlapping some of the stamped images with photographs or decorative papers to create depth. This layering effect can enhance the overall aesthetic of your page. Additionally, use the two ink colors of your Stamp Garden creatively to tie together various elements into a cohesive design. Remember to keep in mind these points as you plan your layout:
- Choose a color scheme that complements your photos and stamped images.
- Incorporate varied sizes and shapes of stamped elements to create visual interest.
- Consider the spacing between elements to avoid a cluttered look.
- Utilize negative space effectively to draw focus to key elements.
Inking Tips
Creating beautiful scrapbook pages with the Stamp Garden can be a rewarding and enjoyable process. To get the most out of your 25 stamps and 2 ink colors, mastering the inking technique is essential. Start by shaking your ink pads gently to ensure the ink is evenly distributed. Use a foam applicator or sponge to transfer ink onto the stamp by dabbing it lightly, as this method provides better coverage than rubbing. Applying ink uniformly across the stamp surface is key; focus on the edges and center to prevent inconsistencies in your stamped image. Be cautious not to over-ink, as excess ink can lead to smudging.
Performing a test stamp on a piece of scrap paper is important before making your final impression. This allows you to evaluate the ink coverage and adjust accordingly. If the stamp doesn’t pick up enough ink, you may need to reapply or switch to a different ink pad. For great results, practice varying your pressure when stamping. A gentle press will yield softer impressions, while applying firm pressure can create bolder, more defined outlines. Keep a few tips in mind:
- Always start with clean stamps to avoid mixed ink colors.
- Clean your stamps promptly after use to maintain quality.
- Consider using a misting technique with water to create a soft watercolor effect.
Incorporating Text
When creating a scrapbook page with the Stamp Garden, integrating text can elevate your design by providing context and enhancing the narrative of your images. Begin by considering different lettering styles that can harmonize with the organic and whimsical nature of your plant and flower stamps. You might opt for a playful handwritten font or elegant cursive writing based on the mood you're trying to convey. For a cohesive look, try to use colors from your ink palette; for instance, if you’re using vibrant greens and floral pinks, consider matching text in shades of these colors or a contrasting hue that pops against your background.
Placement of your text is crucial in ensuring it complements your stamped images. Positioning text near the related stamped elements can create a flow on the page. You could curate a small caption under a stamp to describe it or highlight a personal memory linked to the imagery. Example phrases might include titles such as “Blooming Memories” or dates that anchor the moment. Experiment with text alignment; left-aligned text creates a clean look, while center-aligned text can draw attention to the focal stamped image. Remember to leave ample white space around the text to prevent overcrowding. Here are some additional ideas:
- Mix and match fonts for headings and body text.
- Utilize speech bubbles or banners to frame your text creatively.
- Combine stamped flowers with small snippets of quotes or meaningful words.
Layering Techniques
Creating depth and dimension in your scrapbook pages can truly elevate your craft. Using the Stamp Garden set, which features 25 intricate stamps along with two vibrant ink colors and various plant and flower parts, you can masterfully layer materials to bring your page to life. Start with selecting a base paper that complements your theme—this could be patterned or textured paper. Add various sizes of cut paper pieces in coordinating colors, stacking them in a staggered fashion to add visual interest. Adhesives like double-sided tape or glue dots work wonders at securing these layers without causing unsightly bulges.
Once your base layers are set, use the Stamp Garden to introduce stunning stamped elements. Apply the first ink color to your chosen stamps from the garden, pressing them onto your page to create an anchor point. To create greater depth, repeat the stamping process using the second ink color, layering it slightly offset over the first. This technique not only adds dimension but also creates a sense of movement. Incorporate various embellishments like ribbon, buttons, or even small pieces of twine for added texture. Placing these embellishments strategically over your stamped images can help to unify different elements of your design.
- Choose complementary colors for your paper layers to create harmony.
- Experiment with overlapping elements to see how they interact visually.
- Use foam adhesive squares to raise certain elements for additional dimension.
- Layer non-paper embellishments like sequins for more depth.
- Consider the overall composition by balancing larger and smaller elements throughout the page.
Related Products


Color Coordination
Creating visually stunning scrapbook pages is all about effective color coordination. With the versatile Stamp Garden, which includes 25 unique stamps alongside two vibrant ink colors, you have the perfect foundation to begin your creative journey. To create a cohesive look, understanding basic color theory is essential. Consider how colors interact; complementary colors are opposite each other on the color wheel, while analogous colors sit next to each other. Incorporate these principles by selecting your ink colors first to establish a dominant palette, then look for paper that either enhances or contrasts these colors effectively.
Utilizing a color wheel can be incredibly beneficial for your project. For instance, if you choose a bright green ink for your floral stamps, look for paper that showcases hues of soft pink or light yellow that invite freshness and brightness. Keeping a color swatch book or samples on hand allows you to experiment with various paper textures and finishes to see firsthand how they play with your chosen inks. Here are a few tips to enhance your color selection:
- Start with a base color from the Stamp Garden ink options, then build around it.
- Mix in neutral tones such as white, beige, or soft gray for balance.
- Use stamps with diverse designs to evoke different emotions through color.
- Check for consistency in shades by comparing items in natural light.
Final Touches
After crafting your enchanting scrapbook page with the Stamp Garden, it's time to add those final embellishments that will elevate your design to a new level of artistry. Using the versatile 25 stamps included in the Stamp Garden, consider incorporating additional stamped images or using the assorted plant and flower parts to layer and build depth. You could also employ the two footed ink colors to create a beautifully gradient effect or to emphasize parts of your design, making certain elements stand out. Varying the size and orientation of stamps can lead to a more dynamic and visually appealing layout.
Take your embellishment game a step further by adding a creative border to frame your page. You might find washi tape in vibrant colors or patterns that resonate with the theme of your scrapbook. Glitter can also add a touch of shimmer and sophistication. A sprinkle of glitter on specific flowers or along the edges of your stamps can create a magical sparkle. Sticking to a cohesive color scheme will help you create a polished look. Consider these key enhancements:
- Incorporate stickers or die-cuts that complement your theme.
- Use 3D foam dots to lift certain elements, giving dimension.
- Apply a glossy finish to select areas for a pop of shine.
- Add handwritten notes or quotes to personalize your page further.
- Explore layers with patterned papers beneath some of your stamps.
Preserving Your Work
Once you have crafted your beautiful scrapbook page using the versatile Stamp Garden, the next crucial step is to protect and preserve your art. To begin with, consider sealing your page to prevent any smudging or fading of the ink. Use a spray sealant that is acid-free to ensure your colors remain vibrant over time. Apply the spray at a distance of about 12 inches to get an even coat without saturating the paper. Allow it to dry completely before moving on to the next steps. This layer not only protects your artwork but also enhances its longevity, making sure your memories remain intact.
Storage is another key element in preserving your scrapbook pages. Choose an archival-quality storage box or portfolio to keep your work safe from dust, dirt, and potential damage. If you prefer to display your pages, consider using protective sleeves that are made from non-PVC material. This allows you to showcase your creativity while keeping it safe. If you opt for frames, ensure they come with UV-filtering glass to prevent fading from sunlight. Additionally, keep these displayed pages in a controlled environment, avoiding places with high humidity or fluctuating temperatures.
- Make sure to use acid-free materials throughout the project.
- Consider using a binding system if you're creating a scrapbook with multiple pages.
- Regularly inspect your scrapbook for any signs of wear or damage.
Why We Chose This Product
Choosing the Stamp Garden for this how-to guide was an easy decision, as it offers a delightful range of tools that can elevate any scrapbook project. These stamps are not just simple designs; they open doors to creativity, allowing you to experiment and personalize your pages with ease. The quality and versatility of this product make it a must-have for any crafting enthusiast.
- 25 unique stamps for a variety of designs.
- Two vibrant ink colors to play with.
- Perfect for scrapbooks, crafts, and journals.
- Easy to use for both beginners and experienced crafters.
By focusing on the Stamp Garden, this guide provides not only step-by-step instructions but also encourages crafters to explore their imaginations and create something truly special. Get ready to make unforgettable memories with your art!
The Stamp Garden kit comes with an impressive collection of 25 stamps, featuring various plant and flower designs ideal for anyone looking to enhance their scrapbooking, printmaking, DIY crafts, or journals. With two vibrant ink colors included, this set encourages creativity and self-expression, making each project a reflection of the artist’s unique style. Whether you’re layering textures or creating beautiful patterns, the Stamp Garden provides the tools needed to turn your artistic visions into reality.