Crafting your own personalized stationery can be a delightful and rewarding experience, and with the Letters, Numbers, & Symbols Clear Stamp Set, you're well on your way to creating stunning pieces that reflect your unique style. Whether you're sending heartfelt notes, invitations, or just adding a personal touch to your everyday correspondence, this guide will help you unlock endless creative possibilities.
In this guide, we’ll take you step by step through the process of using these clear stamps to design and customize your stationery. Get ready to unleash your creativity and explore the art of stamping, where precision meets imagination!

The Letters, Numbers, & Symbols Clear Stamp Set is the perfect companion for anyone looking to add a personal touch to their arts and crafts. With 86 individual stamps at your disposal, this set makes it easy to create customized stationery, invitations, and gifts that reflect your unique personality\. Made with high-quality materials, these stamps allow for precise and clean impressions, ensuring that every design maintains its beauty. Whether you're a beginner or a crafting pro, this stamp set is the ideal tool to transform your creative ideas into reality.
Choosing the Right Paper
When creating personalized stationery using the Letters, Numbers, & Symbols Clear Stamp Set, selecting the right paper is crucial for achieving stunning results. The texture, weight, and finish of your paper can significantly affect how well your clear stamps adhere and how vibrant the impressions appear. Here are some excellent paper options to consider:
- Cardstock: This is a popular choice for stationery due to its sturdiness and versatility. Cardstock typically weighs between 80 to 110 lb, offering a substantial base that holds ink well. Choose a smooth finish cardstock to ensure your clear stamps transfer cleanly, providing sharp and defined impressions.
- Textured Paper: For a unique look, textured paper can add depth to your stationery project. However, it's essential to select a texture that won't interfere with your stamping. A subtle linen or felt texture can enhance the tactile experience without compromising the clarity of your design. Ensure the weight is around 80 lb for effective ink absorption.
- Recycled Paper: Environmentally friendly options like recycled paper have become increasingly popular. While this type of paper can have a slightly rough surface, choosing a smoother finish ensures that your ink remains intact. Check for weights similar to cardstock (80 lb+) to maintain structural integrity when stamped.
When selecting paper, think about the finish. A smooth finish is ideal for inked impressions, as it allows for a clean transfer of ink without the risk of your stamps getting caught in any imperfections. If you prefer a more organic feel, a matte finish can exude warmth, but be wary; matte finishes can sometimes absorb more ink than desired, making clean stamps trickier.
- Stick to weights above 80 lb for durability and optimal results.
- Test out different finishes before committing to a bulk purchase to see which yields the best result for your stamping style.
Inking Techniques
Creating vivid impressions with the Letters, Numbers, & Symbols Clear Stamp Set requires mastering various inking methods. Selecting the right ink type is crucial; dye inks provide vibrant colors that dry quickly, ideal for layering, while pigment inks offer more opacity and richness but require longer drying times. Each type of ink can deliver unique results, so experimenting with both can reveal what works best for your creative needs.
Utilizing foam and felt ink pads enhances your stamping experience. Foam pads, typically softer, allow for even coverage, making them perfect for detailed stamps in this set. Felt pads, with their firmer texture, provide crisp impressions but may require a lighter touch to prevent over-inking. When using any ink pad, be mindful of the amount of ink on your stamp; gently tap the clear stamp onto the pad without pressing down too hard to avoid smudging. Here are some additional tips:
- Use a light hand to apply ink evenly.
- Practice on scrap paper to test ink absorption.
- Rotate the stamp while inking to cover all edges.
Designing Layouts
Creating personalized stationery with the Letters, Numbers, & Symbols Clear Stamp Set can be an exciting process. Start by planning your layout on graph paper or using digital design tools to visualize how your stationery will look. This approach helps in achieving a balanced and harmonious design while allowing for adjustments and creativity as needed. Think about the dimensions of your stationery—typically, invites or notecards can range from A5 to A7 sizes—with this shape in mind, sketch out where you want to position your text and symbols.
Focus on the essential elements of your design. For instance, think about the primary message or recipient's name you want to feature prominently on the stationery. Use larger letters or a different font style to emphasize these critical parts. You can arrange the text centrally or off-center, depending on the aesthetic you wish to achieve. Incorporating symbols or numbers can add flair, but ensure they complement the textual elements rather than distract from them. Here are some guiding tips for a balanced layout:
- Utilize symmetry by placing elements evenly spaced on either side of the stationery.
- Experiment with varying sizes of letters and symbols to create depth and interest.
- Leave adequate white space around text blocks, which enhances readability and makes the design feel less crowded.
- Consider integrating lines or borders using the symbols to frame your message, adding to the overall effect of your layout.
After sketching the initial layout, test different combinations by stamping various arrangements of letters, numbers, and symbols. Play with the spacing between elements to find a configuration that feels just right. Remember, less is often more, so avoid the temptation to overcrowd your design with too many elements. This creates an inviting and elegant stationery piece that communicates your unique personality effectively. Here are extra tips to refine your design:
- Think outside the box with placement; consider diagonal alignments for a modern look.
- Use a light pencil to sketch before stamping for precision.
- Don't hesitate to use accents, like a small symbol beside an initial to enhance the theme of your stationery.
- Test with colors or inks as you go, as this can drastically change the visual output of your design.
Stamping Techniques
Utilizing the Letters, Numbers, & Symbols Clear Stamp Set can elevate your personalized stationery into something truly unique. Proper techniques for using clear stamps ensure that every impression is crisp and vibrant. When beginning, always select the stamp you wish to use and place it face-up on your work surface. Use a clear acrylic block to adhere the stamp; it helps maintain visibility and control. To achieve the best results, apply medium pressure when stamping. This avoids the risk of over-pressing, which can lead to smudging or uneven prints. Aim to angle the block slightly so that contact is made evenly across the entire stamp surface.
Another handy technique is the 'rocking' method. This involves gently tilting the stamp once it makes contact with paper to ensure full adhesion without excess pressure. Keep a light touch; the goal is to have just enough force to transfer ink without causing distortion. If you notice uneven prints, inspect your stamping surface. Sometimes, a consistent work surface is essential. You may also try repositioning the stamp or re-inking it before making another print. Consider these tips for troubleshooting:
- Ensure your ink pad is adequately inked to prevent patchiness.
- Test the stamp on scrap paper beforehand to gauge the impression.
- Use a light tapping motion when applying ink to the stamp for a smoother transfer.
- Clean your stamps regularly to maintain their quality and performance.
Layering Designs
Creating personalized stationery using the Letters, Numbers, & Symbols Clear Stamp Set opens up a world of creative possibilities, particularly when you explore the art of layering designs. Start by selecting a base color for your stationery—this sets the tone for your overall design scheme. Once you've chosen your base color, think about how different stamps will work together. Using a light color for the first layer allows for darker colors to stand out when layered on top, enhancing depth and texture. For example, a soft pastel shade can serve as a canvas for bolder, more vibrant colors in your subsequent layers.
When it comes to positioning your stamps, begin by creating a rough layout. You might want to use clear acrylic blocks to visualize how stamps look before pressing them down. Place larger stamps as foundational elements and add smaller details around them to create balance. It’s important to leave some space in between elements to avoid overlap, which can make your design appear crowded. Consider these tips for color coordination and positioning:
- Choose a color palette of 3-4 complementary colors to keep your design cohesive.
- Use transparency techniques to layer colors creatively; for instance, stamping twice with a lighter ink can build a softer effect.
- Test different combinations on scrap paper to see how colors interact before committing to your final design.
- For precise positioning, use a stamping mask to protect areas already stamped while working on adjacent designs.
- Play with angles and rotations of the stamps to create a dynamic visual flow.
- Always clean your stamps between colors to maintain clarity and avoid muddying your design.
- Don’t hesitate to experiment with layering different symbols or letters; they can act as both decorative and functional elements on your stationery.
- Keep a notebook or digital record of successful designs for future inspiration.
Personalizing Greetings
Transform your stationery into a true reflection of your personality with the Letters, Numbers, & Symbols Clear Stamp Set, which includes 86 individual stamps. This versatile set allows you to creatively add initials, names, and custom messages, turning standard stationery into heartfelt greetings for any occasion. Begin by selecting a base card or paper that resonates with the theme of your message. Using different colors of ink can give your stationery an extra touch, appealing to the recipient's senses. Experiment with arrangements by using initials as a focal point at the top of the card. You can also replace traditional headers with your name or a thoughtful word like "Greetings" or "Cheers!" for a more personalized feel.
Consider mixing and matching the stamps for varied effects. For instance, pair a large, bold letter with smaller symbols or decorative elements such as hearts or stars. This juxtaposition not only enhances visual interest but also adds individuality to your cards. Below are some example phrases and stamp combinations to inspire your creative process:
- “Happy Birthday, [Name]!” – Use a bold “Happy Birthday” phrase alongside a number stamp for the age.
- “Just Because” – Incorporate whimsical symbols like stars or flowers to frame this simple phrase.
- “Thank You, [Initials]” – Personalize your message with your initials, making your appreciation feel special.
Embellishments can also play a key role. Create your own custom borders with symbols or small icons that represent the occasion or the personality of the recipient. By layering your stamps and playing with different placements, you can craft a unique greeting that stands out. Explore further with these engaging ideas:
- Stamp “Hello” with a custom message beneath, using a different font style for emphasis.
- Add a date or meaningful number, like anniversaries or milestones, for a truly personalized touch.
- Integrate fun graphics from other stamp sets for an added flair that complements your design.
Embellishing Stationery
Transform your stationery into a truly personalized masterpiece using the versatile Letters, Numbers, & Symbols Clear Stamp Set. This set features 86 individual stamps, allowing for endless creativity. To enhance your stamped designs, consider integrating various embellishments that complement your ink work. One of the most popular methods is incorporating washi tape. Choose tape that matches or contrasts with the colors of your stamped elements to create visual interest. For example, if you use bold, colorful letters, opt for a washi tape with a more muted color palette to allow your stamps to standout.
Another great idea involves adding ribbons to your stationery. Incorporate a soft ribbon that echoes the hues present in your stamped designs. You might tie a bow or create a simple knot to add texture and dimension. Hand-drawn elements further personalize your stationery; consider sketching small motifs or doodles around your stamped text, tying them into the overall design. When thinking about color matching, consider using a color wheel—choosing analogous colors can create a harmonious look, while complementary colors can make your design pop.
- Use washi tape to create borders or frames around your stamped designs.
- Experiment with different types of ribbon for various occasions, such as lace for a formal invitation or jute for a rustic feel.
- Add small hand-drawn elements like stars or flowers that are connected to the theme of your stationery.
- Personalize each note by integrating initials or dates using the stamp set, and embellish them with additional colors for a cohesive look.
Related Products


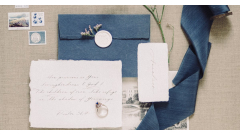
Creating Envelopes
Designing coordinating envelopes with your personalized stationery using the Letters, Numbers, & Symbols Clear Stamp Set can elevate your correspondence and showcase your creativity. Start by selecting a matching color palette for your envelopes that complements the stationery. Consider using high-quality cardstock to give your envelopes a sturdy feel that aligns with the professional look of your letters. Pre-cut envelopes can save you time, but if you prefer a custom size, you can easily create your own by following standard envelope dimensions based on your stationery size.
When it comes to stamping designs on your envelopes, the key is to maintain a clean and organized layout. Reserve the envelope flap or the front side for your designs. Use the clear stamps to create a simple border or a few strategically placed elements, such as initials or symbols, that enhance but do not overwhelm. Here are some helpful tips:
- Choose designs that are simple and cohesive. This prevents overcrowding and lends a polished look.
- Consider spacing your stamps evenly to ensure visual balance. Leaving enough white space can help your designs stand out.
- Test the arrangement with a piece of scrap paper first. This practice allows you to visualize how different elements come together before stamping on your envelopes.
- Utilize the letters and symbols to add personal touches, like your initials or a meaningful date, to make your envelopes even more unique.
- Experiment with different ink colors to find what resonates best with your stationery’s aesthetic.
Finalizing and Caring
Once you've crafted your personalized stationery using the Letters, Numbers, & Symbols Clear Stamp Set, the next important step is finalizing your pieces. You'll want to ensure your stationery is trimmed and cut to the desired size for a polished look. Use a paper trimmer for precise cutting—this tool allows you to achieve clean, straight edges. Depending on the type of stationery you're making, be it cards, invitations, or note sheets, determine the dimensions ahead of time to make cutting easier.
After your stationery is cut to perfection, proper storage of both your finished pieces and clear stamps is essential to maintain quality. Store the clear stamps away from direct sunlight and dust; keeping them in an airtight container or a dedicated stamp storage binder can help preserve their clarity. For the best longevity of the ink used, clean stamps with mild soap and warm water after each use, avoiding harsh chemicals that could damage the material. Allow them to air dry completely before storage. To prevent ink from drying out, tightly seal ink pads after each use; consider using a damp sponge in the storage area to maintain humidity.
- Ensure cutting tools are sharp for clean edges.
- Label storage systems to easily find specific stamps.
- Use acid-free paper for your stationery to avoid yellowing over time.
- Keep ink pads horizontally positioned to ensure even ink distribution.
Usage Ideas
Making personalized stationery with the Letters, Numbers, & Symbols Clear Stamp Set (86 individual stamps) allows for creativity across multiple occasions. One excellent use is creating thank-you cards, where you can mix and match letters to express gratitude. Instead of a generic "Thank You," you could use personalized phrases like "Thanks a Bunch" or "Grateful Hearts." Add unique designs around the text using symbols or decorative elements from your stamp set to create a warm and inviting card.
Invitations for birthdays, weddings, or baby showers also stand out with the use of clear stamps. For a birthday party, incorporate playful fonts and fun symbols like balloons or cakes to enhance the excitement of your invite. Customize each card with the recipient's name and age using your letter stamps for a personal touch. Holiday greetings can take on a unique flair as well; consider using specific numbers to denote the year in your designs and include seasonal symbols to match. Adapting themes based on occasions gives you endless possibilities to explore.
- Create personalized holiday greetings with a mix of festive words and symbols.
- Design unique invitations by using colorful patterns alongside letters and numbers.
- Make custom save-the-date cards adorned with the symbols relevant to your occasion.
- Explore different color combinations to match the mood of each event.
Why We Chose This Product
I chose the Letters, Numbers, & Symbols Clear Stamp Set for this guide because it is such a versatile and user-friendly tool for both novices and seasoned crafters alike. With 86 individual stamps, the potential for expression is vast, allowing you to build your stationery with personal flair and creativity. This guide has been designed to ensure you get the most out of your stamping experience.
- Versatile for various craft projects
- Easy to use for all skill levels
- Allows for personalization in design
- Perfect for creating memorable gifts
Embracing this tool means embracing the joy of personal touch in your correspondence. The satisfaction of making something by hand is unbeatable, and with these stamps, you can leave a lasting impression on every piece of stationery you create!
The Letters, Numbers, & Symbols Clear Stamp Set is the perfect companion for anyone looking to add a personal touch to their arts and crafts. With 86 individual stamps at your disposal, this set makes it easy to create customized stationery, invitations, and gifts that reflect your unique personality. Made with high-quality materials, these stamps allow for precise and clean impressions, ensuring that every design maintains its beauty. Whether you're a beginner or a crafting pro, this stamp set is the ideal tool to transform your creative ideas into reality.